Installing NixOS on Vultr
The first step is to aquire a server on which to run your mail server. It’s possible to do this from home, but most residential ISPs block the ports you will need and do not provide static IPs except at significant extra expense for a business line. So I will be using a VPS (virtual private server), a.k.a. someone else’s hardware. I have chosen Vultr because they are big enough that I’m confident that they will be around for awhile and they are cheap. But there isn’t anything special about them and everything below can easily be done on say a Linode or DigitalOcean VPS.
Whichever VPS provider we choose, choose a plan with at least 1GB of ram. This is more than is needed to run the server, but NixOS is a bit of a ram hog when switching to a new config. (I believe it is possible to get around this limitation by building the configuration locally before pushing it to the server using NixOps, but that’s another post for another day.)
Some VPS providers block SMTP traffic to inconvenience spammers, in particular Vultr does so. We will need to file a support ticket referencing our new VPS asking them to unblock SMTP for us. We will need to reboot the VPS through the web menu to complete the unblocking.
Next step is to install NixOS on our VPS. Follow these instructions from Vultr. On the first step, grab a link to a newer iso from the NixOS Downloads page.
If we are bothering to host our own mail server, there is a good chance privacy is a significant concern for us. We will probably want full disk encryption. If we do want full disk encryption, we will need to set that up during the previous step and before we install NixOS. I have not done so myself, but when I do, I’ll reference Chris Martin on getting LUKS disk encryption setup on nixos to do so. Realistically, whoever has your (running) hardware, has your (in use and therefore decrypted) data anyway. So do not rely on this post for perfect security. This setup provides some modicum of privacy from, say, Google’s profile building, but it won’t stop a determined actor from getting your data. For that you’ll need much more, starting with end-to-end encryption with something like GPG, and advice from a security expert (not me).
My configuration.nix
The mail server we are setting up will run kresd, but kresd is borked on NixOS 17.09. So we need to use Nixos 18.03, which at the time of writing is Nixos-unstable. We can switch to the newest unstable version with:
nix-channel --remove nixos
nix-channel --add https://nixos.org/channels/nixos-unstable
nixos-rebuild switch --upgrade
If you make the mistake I made and run the configuration that follows on NixOS 17.09, the broken kresd will break domain name resolution, in particular it will break the resolution of https://nixos.org/channels/nixos-unstable and prevent nix-channel updates and rebuilds! If you get stuck like this, use
nixos-rebuild switch --rollback
to get back to a good state.
So far we have been working on the console, as root, in Vultr’s web interface. This is not a very pleasant experience. The next thing to do is to get a basic configuration going. We will edit /etc/nixos/configuration.nix to something like the following. Feel free to omit the Fish and Tmux ‘quality of life’ related lines. The import bits are those related to ssh, and the ./mailserver.nix line.
# Edit this configuration file to define what should be installed on
# your system.  Help is available in the configuration.nix(5) man page
# and in the NixOS manual (accessible by running ‘nixos-help’).

{ config, pkgs, ... }:

{
  imports =
    [ # Include the results of the hardware scan.
    ./hardware-configuration.nix
    # ./mailserver.nix # uncomment when ready to run mailserver
    ];

  # Use the GRUB 2 boot loader.
  boot.loader.grub.enable = true;
  boot.loader.grub.version = 2;
  # Define on which hard drive you want to install Grub.
  boot.loader.grub.device = "/dev/vda"; # or "nodev" for efi only

  # List packages installed in system profile. To search by name, run:
  # $ nix-env -qaP | grep wget
  environment.systemPackages = with pkgs; [
    wget
    nano
    sudo
    binutils
    gitAndTools.gitFull
  ];

  system.autoUpgrade.enable = true; # for the lazy sysadmin, me.

  # Some programs need SUID wrappers, can be configured further or are
  # started in user sessions.
  programs.fish.enable = true;
  # programs.mtr.enable = true;
  # programs.gnupg.agent = { enable = true; enableSSHSupport = true; };

  # List services that you want to enable:
  programs.tmux = {
    newSession = true;
    enable = true;
    historyLimit = 10000;
  };

  # Enable the OpenSSH daemon.
  services.openssh.enable = true;
  # services.openssh.ports = [ <port of choice> ];

  # uncomment these two lines once you've copied over your ssh
  # public keys with ssh-copy-id
  # services.openssh.permitRootLogin = "no";
  # services.openssh.passwordAuthentication = false;

  # Open ports in the firewall.
  # networking.firewall.allowedTCPPorts = [ ... ];
  # networking.firewall.allowedUDPPorts = [ ... ];
  # Or disable the firewall altogether.
  # networking.firewall.enable = false;

  # Define a user account. Don't forget to set a password with ‘passwd’.
  users.extraUsers.tim = {
    isNormalUser = true;
    uid = 1000;
    group = "users";
    extraGroups = ["wheel"];
    shell = pkgs.fish;
  };

  # This value determines the NixOS release with which your system is to be
  # compatible, in order to avoid breaking some software such as database
  # servers. You should change this only after NixOS release notes say you
  # should.
  system.stateVersion = "17.09"; # Did you read the comment?

}
My mailserver.nix
The best thing about NixOS is declarative configuration. This makes it easy to maintain and version control your configuration. But it also makes it really easy to share configuration work.
We are going to use the Simple NixOS Mailserver to do the heavy lifting. The security conscious person will want to review the repo (it is small enough for one person to review) and pin their configuration to one version thereof, so that they don’t accidentally pull in malicious changes when they update.
At this point we can follow the SNM setup guide. We need to choose a fully qualified domain for our mail server, in general this will be a subdomain of a domain we are in possession of, in my case I will use mx.timput.com. Here’s my (slightly redacted) mail config:
{ config, pkgs, ... }:
{
  imports = [
    (builtins.fetchTarball "https://github.com/r-raymond/nixos-mailserver/archive/v2.1.3.tar.gz")
  ];

  mailserver = {
    enable = true;
    fqdn = "mx.timput.com";
    domains = [ "timput.com" ];

    # A list of all login accounts. To create the password hashes, use
    # mkpasswd -m sha-512 "super secret password"
    loginAccounts = {
        "tim@timput.com" = {
            hashedPassword = "<hashed password goes here>";

            aliases = [
                "postmaster@timput.com"
            ];

            # Make this user the catchAll address for domains example.com and
            # example2.com
            catchAll = [
                "timput.com"
            ];
        };
    };

    # Extra virtual aliases. These are email addresses that are forwarded to
    # loginAccounts addresses.
    extraVirtualAliases = {
        # address = forward address;
        # "abuse@example.com" = "user1@example.com";
    };

    # Use Let's Encrypt certificates. Note that this needs to set up a stripped
    # down nginx and opens port 80.
    certificateScheme = 3;

    # Enable IMAP and POP3
    enableImap = true;
    enablePop3 = true;
    enableImapSsl = true;
    enablePop3Ssl = true;

    # Enable the ManageSieve protocol
    enableManageSieve = true;

    # whether to scan inbound emails for viruses (note that this requires at least
    # 1 Gb RAM for the server. Without virus scanning 256 MB RAM should be plenty)
    virusScanning = false;
  };
}
Place this file along side configuration.nix in etc/nixos
The remainder of the SNM guide is easy to follow, once you understand what is meant by server-IP, server-FQDN and domain; but we will visit these points in the next section. For illustration in my case these values are:
- server-IP = <ip-address of my Vultr VPS>
- server-FQDN = mx.timput.com
- domain = timput.com
At this point, we can uncomment the ./mailserver.nix line in our configuration.nix, run a ‘nixos-rebuild switch’ and we have a running mail server!
NFS settings
Now we need to get our mail directed to our server; we need to setup the DNS records which let other mails servers find out about our server from an email address. Most guides assume you already have a mail server setup with its own domain. An individual user is likely to only have an IP address for their mail server at this point. We will give our mail server a sub-domain of our personal website. That’s what the A record in the DNS record below does. For reference here is what the DNS record control panel on NearlyFreeSpeech looks like for this site:
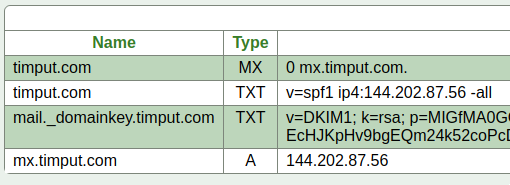
Don’t worry about my privacy, all of that info is publicly available as you can see by playing around with the ‘host’ and ‘dig’ tools on the command line.
Wait a few minutes for the DNS records to propogate and then send and receive some test emails!
Review of sticking points
Your DKIM DNS record may not look exactly like the SNM guide’s example. Mine for example needs the type of the key
v=DKIM1; k=rsa; p=...
- server-IP = <ip-address of my Vultr VPS>
- server-FQDN = <your mail subdomain> e.g. mx.timput.com
- domain = <your domain> e.g. timput.com
You will need to setup a subdomain of your primary domain for you mailserver, and it will need to be used consistently across configurations.
Look through your logs by running:
journalctl -r
and make sure your SMTP packets are getting through, if they are not, talk to your service provider about getting unblocked.